Back pain after sitting for long periods of time? We’ve all been there. But if this sounds like you at the moment, chances are–you could benefit from the psoas march exercise.
The psoas is a hip flexor muscle. It connects your lower back to your hips on either side of your spine. And because of this connection, if your hips have been bent in a sitting position for too long, it’s actually your lower back that tends to suffer.
People with tight, short, angry, weak psoas muscles tend to feel pain in their:
→ Lower back
→ Upper Thighs…
…after sitting for too long.
So, if you’re reading this and saying, “Yup - that’s me,” what’s your next move?
Simple answer: The psoas march.
Here at Back Muscle Solutions, we don’t think back pain has to be confusing. We teach a 4-step approach to solving persistent back pain:
Step 1: Massage
Step 2: Stretch
Step 3: Strengthen
Step 4: Habit Correction
The psoas march falls under Step 3: Strengthening!
When you strengthen your psoas with the psoas march, you can address:
→ Lower back pain
→ Tight hip flexors
→ And even weak core muscles!

In this article, I’ve compiled the most popular psoas march variations from across the internet–all in one place for your convenience.
Here’s what we’ll cover:
- 6 Best Psoas March Variations
1) Lying Psoas March (No Band)
2) Banded Lying Psoas March With Box Support
3) Banded Lying Psoas March
4) Banded Elevated Lying Psoas March
5) Banded Standing Psoas March With Wall Support
6) Banded Standing Psoas March
- Psoas March Benefits
- Psoas Anatomy
- 4 Steps to Heal from Psoas-Induced Back Pain
- All Our Best Psoas Resources
- Psoas March FAQs
Let’s march.
6 Best Psoas March Variations
If you scour the internet for the psoas march, you’ll find multiple variations–each with differing levels of intensity. To make things easier, I’ve put all the best psoas march variations together here in one place.
I’ve organized the variations below from easiest to hardest. So, depending on how weak your hip flexors feel at the moment, you can cater the level of intensity to your needs. The first exercise is without a resistance band, and the rest are all banded psoas march variations.
1. Lying Psoas March (No Band)
Also known as the supine psoas march, this psoas march variation is the lightest. If your hips feel extra weak, this is the perfect place for you to start your psoas march journey. Level one.

How to Perform This Psoas March
1) Lie down on your back on a yoga mat.
2) Raise up your legs, so your knees both form 90-degree angles, and your calves are parallel to the floor.
3) Extend your right leg out while keeping your left leg bent.
4) Slowly return your right leg to the starting position.
5) Next, alternate legs, so your left leg is the one extending.
6) Continue alternating legs until each leg gets 10-12 reps.
Pro Tips
→ Keep your abs tight during the psoas march.
→ Keep your back flat against the ground, avoiding any arch or opening between your back and the floor.
→ When you raise your legs up higher, the lying psoas march is easier.
→ When you keep your legs lower, extending them out further, the lying psoas becomes more difficult.
This is the only unbanded psoas march I’ll talk about in the mix today. But keep in mind that every single one of the psoas march variations in today’s article can be completed without a band to make the exercise easier.
Once the lying psoas march feels easy enough without a band, it’s time to take it up a notch with the banded psoas march. (Read on!)
2. Banded Lying Psoas March With Box Support
Next up, we add a mini band into the mix to add an extra layer of resistance for your psoas and ab muscles.
Since we’re leveling up with the band, I like to add a layer of support by elevating your feet up onto a box or bench.


How to Perform This Psoas March
1) Lie down on your back on a yoga mat.
2) Place a mini band around your feet.
3) Next, place both heels on a box, keeping your knees bent. Allow the box to take the weight of your legs and feet.
4) And now we march! Bring your right knee up towards your stomach–keeping your left leg stationary and your left heel on the box.
5) Slowly return your right leg to the starting position.
6) Next, alternate legs, straightening out your left leg while keeping your right leg still.
7) Continue alternating legs until each leg gets 10-12 reps.
Pro Tips
→ Return your heel to the box with control, resisting against the band for optimal psoas work!
Remember
→ Keep your abs tight during the lying banded psoas march.
→ Keep your back flat against the ground, avoiding any arch or opening between your back and the floor.
3. Banded Lying Psoas March
With this variation, we take away the box for support. When we do this, you’ll feel your abs and hip flexors working harder to keep your legs and feet above you.
Multitasking muscle work is part of what makes the psoas march so great! While the working side psoas actively contracts to bring the knee up, the resting side psoas works to stabilize your pelvis.

How to Perform This Psoas March
1) Lie on your back on a yoga mat.
2) Place a mini band around your feet.
3) Elevate your legs above you, so your knees form 90-degree angles.
4) Keeping your left side stable, kick out your right leg in front of you against the resistance band.
5) Under control, return your right leg to the starting position.
6) Repeat the same motion with your left leg, alternating each side.
7) Repeat so each side gets 10-12 reps when alternating.
Pro Tips
→ Once you add in a resistance band, you’ll have to fight extra hard to keep that back flat on the floor.
→ If your back keeps arching during the lying banded psoas march, imagine 1) pulling your abs in towards the floor, and 2) you can also lift your head up off of the floor, which is just a helpful way to help keep your core activated.
Remember
→ When you raise your legs up higher, the lying psoas march is easier.
→ When you keep your legs lower, extending them out further, the lying psoas becomes more difficult.
4. Banded Elevated Lying Psoas March
Remember that box we used to make life easier in Level 2?
Well, now we need it again. Or an even higher box potentially.
And this time, that box is gonna make your life a bit more challenging. This version gets your glutes and hamstrings involved, which you might hate in the moment. But I promise it’ll pay off in the end.


How to Perform This Psoas March
1) Lie on your back on a yoga mat.
2) Place a mini band around both feet.
3) Elevate your feet by placing both heels on a box.
4) Instead of keeping your back flat on the floor, bridge up–forming as straight a line as you can from your abs through your legs and to your heels.
5) Now, drive your right knee up towards your stomach–keeping your left heel stable on the box.
6) Then, slowly bring your right leg to the starting position, so your right heel returns to the box.
7) Repeat this motion with your left leg.
8) Repeat so each side gets 10-12 reps when alternating.
Pro Tips
→ Even though the focus is no longer on the flat back, you still need a tight core here. This will help with balance and strength during the elevated psoas march. If you notice that you are rocking or rotating, more core engagement is needed.
→ When you activate your glutes during the elevated psoas march, you ensure glute work as well. This means not allowing your butt to sag during the bridge.
→ The banded elevated psoas march is one of the toughest out of all of these psoas march variations. So be sure to take it easy at first, and there's no shame in going back to a previous level if you need to.
5. Banded Standing Psoas March With Wall Support
You can also perform a psoas march in a standing position instead of a lying position.
In general, you’ll find the standing psoas march variations a bit more challenging, and that’s because the standing psoas march:
- Requires balance: As you raise one leg up, you’ll naturally have to use the other leg to stabilize. This engages your core and hip stabilizers even more.
- Places more demand on the standing leg: The standing leg has to work harder to prevent hip rotation. So that means more psoas, glute, and core work.
- Is more functional: We normally don’t tend to march while lying down in everyday life. But marching while standing applies to walking and running–both everyday, functional movements.
This first standing psoas march uses the support of a wall to get you started on a lighter note.

How to Perform This Psoas March
1) Stand facing a wall–about two feet away from the wall.
2) Place a mini band around your feet.
3) Place both palms out in front of you, against the wall. You’ll find your torso leaning at a slight angle.
4) Drive up your right knee–keeping your left foot planted firmly on the ground.
5) Slowly return your right foot to the ground, under control against the resistance band.
6) Left leg’s next; repeat the same motions with your left leg.
7) Repeat so each side gets 10-12 reps when alternating.
Pro Tips
→ The same rules apply here when it comes to keeping your back flat and in a neutral position.
→ Keeping your abs engaged prevents excessive lumbar extension.
6. Banded Standing Psoas March
All bets are off with this banded psoas march variation.
Standing, so balance is harder.
A band to add resistance.
No wall for support.
Good luck, my friend.

How to Perform This Psoas March
1) Stand with a mini band around your feet.
2) Drive up your right knee–keeping your left foot planted firmly on the ground.
3) Slowly return your right foot to the ground, under control against the resistance band.
4) Next, repeat on the left.
5) Repeat so each side gets 10-12 reps when alternating.
Pro Tips
→ The key here is to prevent your hips from wobbling around as you stand straight and tall during this standing psoas march.
→ If this version is too hard right now, it doesn’t mean it always will be. Do yourself a favor and go back to an easier version. Then, you can build up to this version when you’re ready.
Psoas March Benefits
There are plenty of benefits to adding the psoas march to your workout routine.
Loosens Sticky Hip Flexors
If you have tight or sticky hip flexors, the psoas march is a great exercise to get out of creaky, painful hip flexors and the inevitable lower back pain that stems from this.
Learn more about this here:
Sticky Hip Flexors and Lower Back Pain w/ 4 Steps To Relief
Improve Hip Impingement Pain
If you’re suffering from hip impingement, one of the best ways to get out of that pain is to strengthen your hip flexor muscles, such as the psoas.
For a list of the best hip impingement exercises, check out our article below:
“7 Best Hip Impingement Exercises And Movements To Avoid”
Improve Stability
Since the psoas march emphasizes just one limb at a time–no matter which variation you try–this exercise helps you focus on ironing out any discrepancies in strength between sides.
Build Athleticism
As we know, the psoas enables you to run, walk, and sprint–all the movements necessary for athleticism, power, and speed.
Psoas Anatomy
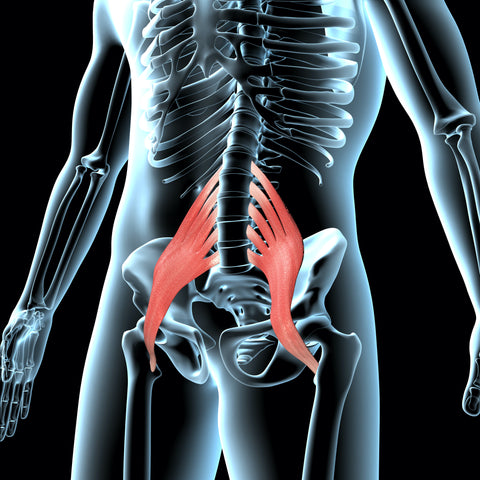
The psoas connects from the top of your leg through your guts and all the way to your lower back.
To find your psoas: Place your thumb on your belly button and your pinky on your bony hip bone. The psoas lies just between those two landmarks.
4 Steps to Heal from Psoas-Induced Back Pain
Remember how I said that, at Back Muscle Solutions, we teach a 4-step process to healing from back pain? Let’s put it all in context now.
Step 1: Psoas Massage
Before you strengthen your psoas with the psoas march, I always recommend starting with massage through trigger point therapy.
Why?
Well, when we try to stretch or strengthen muscles that have been dormant through hours of sitting at work, it tends to actually just leave us in more pain.
So, how do you go about massaging a random muscle like the psoas?
You’ll probably need more than a massage ball for this one.
I like using the QL Claw because it’s one of the only massage devices on the market that’s actually designed to hit the psoas.

Picture yourself on a Friday night. You just get home from sitting for hours on end at work–all week long. And you start to feel lower back pain that you know is from sitting too long.
Scheduling with a massage therapist isn’t always the most accessible option.
But the QL Claw is a portable massage option to get you out of lower back pain after sitting too long…by massaging your psoas.
Here’s what people have to say about the QL Claw:


Learn more about the QL law by clicking the button below:
To learn more about psoas massage, check out the article or video below:
Psoas Release
Step 2: Psoas Stretch
For a great resource on Step 2: Stretching the Psoas, check out the article below:
“Psoas Stretch: 6 Psoas Stretches That'll Shut Down Your Back Pain”
Step 3: Psoas Strengthening
This article’s got you covered!
But for more psoas exercises, check out the article below:
“7 Best Psoas Muscle Exercises: Stretch and Strengthen Your Psoas”
Step 4: Habit Correction
Check out the article below for tips on maintaining a neutral spine while at work and creating an ergonomic workspace:
“What’s the Most Important Benefit of Maintaining a Neutral Posture”
All Our Best Psoas Resources
Psoas muscle health is kind of our thing. Check out some more resources to learn about how to keep your psoas strong.
Article
“What Does Psoas Release Feel Like? Physical & Emotional Relief”
Videos
Signs Of A Psoas/Iliacus Problem (Pain Getting Up From Sitting)
What Does Psoas Release Feel Like? (part 1)
What Does Psoas Release Feel Like? (Part 2)
Psoas March FAQs
What does the psoas march do?
The psoas march strengthens your psoas to promote healthy hip flexor muscles and prevent lower back pain.
What are the benefits of hip flexor march?
The hip flexor march–or psoas march–helps prevent sticky hip flexors, build strength and power in your hips, and prevent lower back pain.
Does marching help hip flexors?
Yes, the psoas march is a great exercise to help your hip flexors after sitting too long.
What are the symptoms of psoas muscle spasms?
Psoas muscle spasms are associated with pain in the lower back, hips, butt, groin, and thighs.
What emotion does the psoas hold?
Many believe the psoas holds trauma and emotion since it is so closely connected to the gut.
What is the fastest way to release the psoas?
The fastest way to release the psoas is by using a massage release device that’s designed specifically to hit the psoas–such as the QL Claw.
Sources:
[1] https://www.tandfonline.com/doi/pdf/10.1080/1355297X.2007.11736333
[2] https://www.jospt.org/doi/full/10.2519/jospt.2017.6730
[3] Donnelly, Joseph M. Travell, Simons & Simons Myofascial Pain and Dysfunction: the Trigger Point Manual. 3rd ed., Wolters Kluwer Health, 2019.
[4] Davies, Clair, and Amber Davies. The Trigger Point Therapy Workbook: Your Self-Treatment Guide for Pain Relief. 3rd ed., New Harbinger Publications, Inc., 2013.
i was told there is no Herpes except treatment to control it. I totally lost hope all i could think was losing my life because it was so embarrassing to have this virus. A few weeks ago I read about a possible natural cure which was guaranteed. And I ordered the treatment from Dr DADA. And I also told him about my sister’s cancer, After some weeks we got 100% cured. Now I’m so excited to share this testimony to every article for others living with HERPES, CANCER, PENIS ENLARGEMENT, HPV,HIV, etc there is possible natural treatment to eliminate this virus website https://drdadaherbalcentre.wixsite.com/drdadaspecialremedie or massage him on whatsapp +2348153082665