And you know how to do a pull up. But when you grab the bar, your body refuses to cooperate. You’re sick and tired of pull ups, and you need a break. BUT you still want to work your muscles.
You need the neutral grip pull up, my friend.
If you’re looking for an easier variation of the pull up that still gives you a fantastic workout for your back and biceps, look no further.
The neutral grip pull up:
- Is easier than regular pull up
- Works very similar muscles
- And it is a great way to build stamina and strength in your back and biceps!
Today we’ll cover:
- Neutral Grip Pull Ups: How to
- Neutral Grip Pull Ups vs. Pull Ups
- Neutral Grip Pull Ups: Pro Tips & Common Mistakes
- Neutral Grip Pull Ups: Muscles Worked
- Neutral Grip Pull Ups: Variations
We're Back Muscle Solutions, and we help people stop wasting time and spending money on back treatments that don't last. Our system for treating backs helps provide longterm back-pain relief relief from your own home.
Neutral Grip Pull Up: How To
With a regular pull up, you have a pronated grip, which means your palms are facing forward when you grab the bar.
With a neutral grip, your palms are in…shocker, I know…a neutral position…
…meaning your palms are facing IN towards your face–just like when your hands are held naturally at your side.
To do a neutral grip pull up, you’ll need a special neutral grip pull up grip or perpendicular high bars (which I’ll explain later).
But first, let’s get into a step-by-step of a neutral grip pull up how to:

1) Find a neutral grip pull up bar at your gym or use neutral grip pull up grips.
2) Grab the handles of the neutral grip pull up bar with a neutral grip (palms facing in towards each other).
3) Beginning in a dead hang position (letting your body fully hang from the bars), you’ll then activate your shoulders, squeezing them together and puffing out your chest.
4) Now, lift up your torso, bringing your chest to the same level as your hands.
5) Pause briefly at the top.
6) Now, lower your body–not going all the way down to a dead hang but keeping your shoulder blades engaged in an active hang position.
7) Repeat for 10-15 reps.
Neutral Grip Pull Up vs. Pull Up
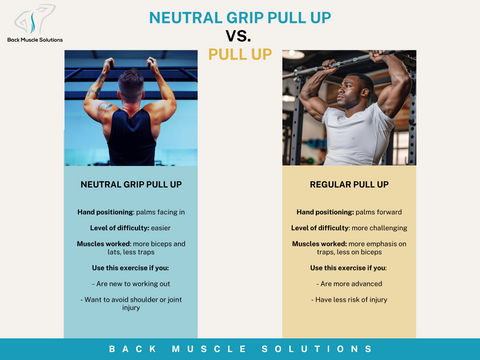
So now that you know how to perform a neutral grip pull up, let’s compare: Neutral grip pull up vs. pull up. There are several neutral grip pull up benefits that many people don’t know about.
Hand Positioning
As we already covered, your hands are in a neutral position during a neutral grip pull up. This is different from a regular pull up, where you grab the bar with palms facing forward in a pronated grip.
Equipment
Speaking of hand positioning, you’ll need to use a specific neutral grip pull up bar or handles in order to achieve neutral hand positioning.
For this, some gyms have perpendicular high bars that naturally enable you to do use this grip. If this isn’t an option at your gym, there are also special handles that you can hook on to a regular pull up bar to achieve a neutral grip.
Other equipment people use for a neutral grip pull up bar includes monkey bars or gymnastics rings.
Regarding ease of accessibility–when comparing the neutral grip pull up vs. a regular pull up, there is usually easier access to a regular pull up bar. This makes regular pull ups sometimes easier to do at a gym with limited equipment.
Level of Difficulty
Most people experience the neutral grip pull up as an easier variation of a regular pull up. The angle just makes it a bit easier on your shoulders and joints.
This makes the neutral grip pull up an obvious choice for beginners–especially those who want to work on form and build up to higher levels of difficulty within their pull ups.
Less Risk of Shoulder Impingement
The neutral grip pull up provides less opportunity to injure your shoulders, which is one of the most obvious benefits of this pull up variation.
Regular pull ups are a good exercise, but they do come with a higher risk of shoulder injury since they repeatedly put pressure on your rotator cuff tendons.
Joint Friendly
Because regular pull ups are so difficult, lots of people struggle to get a full range of motion during the exercise. When this happens, this can be hard on the joints, especially your shoulders, elbows, and wrists.
The neutral hand position eliminates a lot of these concerns.
Muscle Activation
Compared to regular pull ups, neutral grip pull ups work many similar muscles. This variation places more emphasis on your lats and biceps–and less on your traps. [1]
Neutral Grip Pull Up: 8 Pro Tips & Common Mistakes
When it comes to mastering your form for a neutral grip pull up, it takes a few tweaks to really look like a pro! Check out these 8 pro tips for ways to master your form and avoid some common mistakes.
1. Use a Grip That is Shoulder-Width or Slightly Wider
If you’re dealing with two perpendicular high bars at the gym, you may not have a choice how far apart your hands are when you perform a neutral grip pull up.
BUT if you are using handles, it is preferable to use a grip that is shoulder-width or slightly wider.
2. Engage Your Shoulder Blades Before the Motion
I like starting this exercise in a dead hang.
A dead hang is when you let your body fully hang from a pull up bar. During a dead hang, our arms are fully extended, and you’ll feel a good stretch in your shoulders.
Why do I like starting in this position? Because it’s super important to feel the difference between a dead hang and an active hang.
The thing is: you’ll really want to be in an active hang for the rest of the exercise after you start.
An active hang is when you pull your body up slightly, contracting your shoulder blades together. You’ll feel less of a stretch in your shoulders during this motion.
By activating your shoulder blades in an active hang before you even start the neutral grip pull up, you ensure muscle activation. And when you keep yourself in this active hang–even at the bottom of the motion–you continue this muscle engagement!
3. Go Down Slowly
Speaking of the bottom of the motion, lots of people like to drop their body back down quickly after a pull up.
This totally defeats the purpose of slow and controlled muscle activation. Not to mention, it puts your joints in a potentially sticky situation.
So, in addition to remaining in an active hang at the bottom of the motion, you’ll want to make sure you slowly lower yourself down to that position. I like to count to 3 seconds as I slowly lower myself down.
4. Get Explosive On the Way Up
While you do want to keep it slow and controlled on the descent, it does pay to put a little umph into the ascent.
This explosive motion will help you get the momentum to raise your chest all the way up.
5. Don’t Go Up Too Far
This explosive motion up is super important, BUT you don’t want to overdo it.
Some people will pull their chests too far up above their hands. But when you do this, you risk losing a neutral spine, which is super essential to preventing back pain.
Raise your chest up too high, and you might start arching your back.
6. BUT Don’t Stay Too Low
I know. It’s annoying. You can’t go too high, and you also can’t stay too low.
But finding that balance is so important for you to optimize your muscle growth and minimize injury!
Because pull ups are just difficult in general, it’s super easy to get lazy and NOT pull your torso up far enough.
In my opinion, not pulling themselves far up enough is a far more common mistake for people just trying out the neutral grip pull up. Some people will just barely try to get their chin up to their hands–stretching their necks to reach.
I can relate because I’ve definitely been guilty of this.
To avoid this: Think about bringing your CHEST up to your hands–NOT just your chin.
7. Avoid Rounding Your Back
It’s also really easy to ROUND your back at the top of the motion–sinking your chest in at the same time.
When you do this, you take away the strength of your back, which is so important to the motion of a neutral grip pull up.
You also bring your spine out of neutral position, which as I said earlier, is essential to avoid back injury during exercise.
8. Keep Your Body Tight
Lots of people like to cross their feet during a pull up.
Again, I’m guilty of this.
And when you do this, you allow your lower body to just sort of dangle below you.
BUT–keeping your body rigid during a pull up is pivotal to engaging your entire body!
What does this look like?
- Brace your core.
- Engage your glutes.
- Engage your quads.
- Engage your calves.
- Keep your legs extended out and parallel to one another.
Try this, and I guarantee you’ll feel a difference in the explosive momentum you’re able to get on the way up!
Neutral Grip Pull Up Muscles Worked
Neutral grip pull ups primarily target your:
- Lats: The neutral hand position helps you place extra emphasis on those lats–the biggest muscles in your back. They’re worth your attention!
- Biceps: Similar to a supinated grip (palms facing you) with a chin-up, the neutral grip pull up places more emphasis on your biceps than a regular pull up.
But you’ll also engage other back muscles, such as your:
- Traps
Before the Neutral Grip Pull Up: Massage & Stretch
If you're interested in the neutral grip pull up because you want a good workout for your lats and other back muscles, then we've got some other great resources for you.
At Back Muscle Solutions, we always recommend getting your muscles ready to work out in the following order:
1) Massage
2) Stretch
3) Strengthen
And we've got resources for all of those steps when it comes to the neutral grip pull up muscles worked.
STEP 1: Massage Before Your Neutral Grip pull Up
Lat Massage: When it comes to massaging the predominant muscle uses during the neutral grip pull up, it's all about the lats. Massaging your lats is easily accomplished with a foam roller.

Here's how you do it:
1) Start by lying on your side.
2) Position a foam roller underneath your lat muscle.
3) Gently roll along the foam roller, moving from just below your armpit down to your lower back, covering the entire length of your lat muscle.
4) Continue rolling until you notice a release, which will feel like the muscle is loosening or relaxing.
5) Once you're done, switch to the other side and repeat.
Rhomboid Massage: One of the other muscles you engage during the neutral grip pull up is the rhomboid. To massage your rhomboid, I recommend using a massage device with a trigger point, such as the QL Claw. This will really help target this hard-to-reach muscle.


Here's how you do it:
1) The QL Claw can be used against a wall. Some may prefer lying on top of it, so feel free to choose whichever method is most comfortable for you.
2) Locate the tightest area of the muscle and begin applying pressure. You might feel some discomfort at first, but as the tissue loosens and lengthens, it will become more comfortable.
3) Once you've identified the spot where the muscle feels most tense, relax and allow your muscle to sink into the tool for deeper relief.

The QL Claw is not just limited to working your rhomboid muscles either. We designed it as the only lower back massager on the market with a trigger point that targets all 5 muscles that contribute to lower back pain.
If tight lower back muscles are stopping you from enjoying the active lifestyle you crave, check out the link below to learn more about how the QL Claw has brought our customers FROM stiff, achey, and limited TO active, flexible, and pain-free.


STEP 2: Stretch Before Your Neutral Grip Pull Up
Once your muscles are massaged, they are loose, relaxed, and ready to stretch. Here are some great resources for how to stretch the neutral grip pull up muscles worked.
Lat Stretch: There are lots of great lat stretches you can do after massaging your lats. My favorite one also uses the foam roller.

Here's how you do it:
1) Start by kneeling on a yoga mat and moving into child’s pose. Push your hips back while extending your arms forward.
3) With your thumbs pointed upward, gently roll forward using the foam roller to guide you. As you do, extend your arms and shift your hips forward to deepen the stretch.
4) Finally, roll back to your starting position.
"8 Best Lat Stretches for a Strong, Flexible Back"
Trapezius Stretches: Another muscle worked during the neutral grip pull up is the trapezius, and a good trapezius stretch before this exercise can make all the difference.

Here's how you do it:
1) Begin by sitting on a yoga mat.
2) Gently tilt your head to the left, bringing your ear toward your shoulder.
3) Next, lift your left arm over your head and place your hand on your right ear. This will apply a bit more pressure, but it should remain comfortable and pain-free.
4) Breathe deeply, holding the stretch for several seconds before releasing.
5) Repeat the process on the other side.
"8 Trapezius Stretches to Loosen Tight Traps"
STEP 3: Strengthening
Neutral grip pull ups are a great strengthening exercise for your lats, but for some other great resources on lat exercises:
"Supinated Lat Pulldown: Fire Up BOTH Bicep & Lat Growth"
"Top 5 Lower Lat Exercises for Beginners"
Neutral Grip Pull Up Variations
If you’re looking to take this exercise and make it either easier or more difficult, there are neutral grip pull up variations that are definitely worth checking out!
Neutral Grip Pull Up Variation (Easier)
For an easier version of this exercise, you can use either an assisted pull up machine–or using resistance bands to assist you.
Assisted pull up machines involve you setting a weight/level of assistance and placing your knees on a pad while you still use your arms to pull your body up.
The only difference is, the pad serves to hold up part of your body weight.
The downside of this is that the assistance provided by this machine can easily lead to a disengaged core–not fully replicating the form you’ll eventually need to do killer neutral grip pull ups.
A BETTER alternative is the neutral grip pull up resistance band-style.
With this neutral grip pull up variation, you can loop the band around the pull up bar and then loop the other end around one of your feet.
The band will naturally assist you on the way up–but you’ll still have to maintain good form and a tight core throughout the motion!
Neutral Grip Pull Up Variation (Harder)
To make the neutral grip pull up even harder, all you have to do is add some weight to your natural body weight.
You can do this easily using a weighted belt, which has a chain on it, enabling you to attach weight plates. This is the perfect way to level up your neutral grip pull up game!
Neutral Grip Pull Up FAQs
What does neutral grip pull up work?
The neutral grip pull up works more lats and biceps than a regular pull up–also engaging your traps, rhomboids, and rear delts.
What is the difference between wide grip and neutral grip pull ups?
A wide grip pull up uses a pronated (palms forward grip) with a wider grip while the neutral grip pull up uses a neutral (palms facing in) grip that is shoulder-length or just slightly wider.
What grip is best for pull-ups?
Regular pull-ups use a pronated grip.
Chin-ups use a supinated grip.
And neutral pull ups use a neutral grip.
All 3 grips come with different pros and cons, but the benefits of a neutral grip is that it’s easier to hoist your body up–making the neutral grip pull up a great choice for beginners!
What is a pull-up vs chin-up vs neutral grip pull up?
A pull up uses a palms-forward grip. A chin-up uses a palms-facing-you grip. A neutral grip pull up uses a palms-facing-in/neutral grip.
(Read more about pull ups and chin ups on our page about vertical pull exercises.)
Do neutral grip pull-ups build arms?
Neutral grip pull ups build arm muscles–particularly your biceps!
How many neutral pull-ups is good?
Typically, 3 sets of 10-15 reps is recommended for neutral grip pull ups.
[1] https://www.sciencedirect.com/science/article/abs/pii/S1050641116302978
[2] https://journals.lww.com/nsca-scj/fulltext/2013/02000/Article.12.aspx